Magnetic Encoder Design for Electrical Motor Driving Using ATS605LSG
Introduction
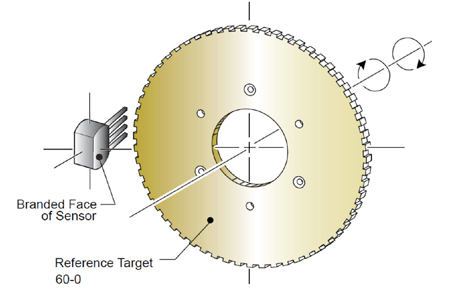
Encoders are normally used in electrical motor control systems to synchronize the excitation signals. This application note describes how to use a Hall sensor device such as the Allegro ATS605LSG as an encoder in a system with a ferrous target, and gives target design recommendations to achieve outputs in quadrature and a 50% duty cycle for each output.
Advantages of Magnetic Encoder
When designing a system with an electrical motor, the feedback loop is crucial to provide accurate excitation to the motor and increase its efficiency. An electrical motor system is often subject to more than electrical constraints; the size and the magnetic environment can also impact the overall performances. The advantages provided by a magnetic encoder such as the ATS605LSG include:
- Immunity to external field
- Simple construction
- Ferrous target use
- Automotive compliance
- System size
- Design freedom
Guidelines for Motor Driving
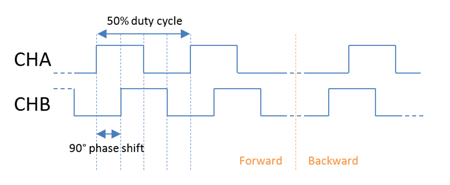
The encoder provides two signals in quadrature of phase, called CHA and CHB (Figure 2). These signals are used to provide the required feedback to the controller and adjust the motor excitation signals.
General Application Requirements
The design of the mechanical target can vary for each application. However, some parameters can be defined as general requirements for encoder systems and will be consistent for the majority of applications:
- Duty cycle accuracy 50% ±10%
- Phase shift accuracy 90° ±10°
- Air gap from 0.5 to 3.0 mm
- Temperature range –40°C to 150°C
The guidelines provided in this document focus on achieving these parameters.
If different parameters are required, this will impact the target design—contact a local Allegro application engineer to optimize the target design.
ATS605LSG Dual Differential High-Speed Sensor
The ATS605LSG sensor is a dual independent output differential sensor with integrated magnet. The ATS605LSG is specially designed to monitor speed and direction of a ferrous target.
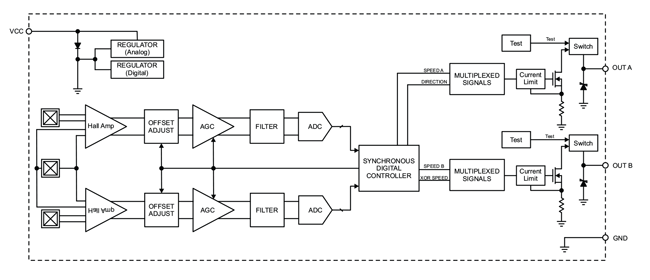
Three Hall elements are incorporated to create two independent differential channels (differential sensing provides high immunity to external field). These channels are processed by the IC which contains a sophisticated digital circuit designed to eliminate the detrimental effects of magnet and system offsets. Hall differential
signals are used to produce a highly accurate speed output (Figure 3).
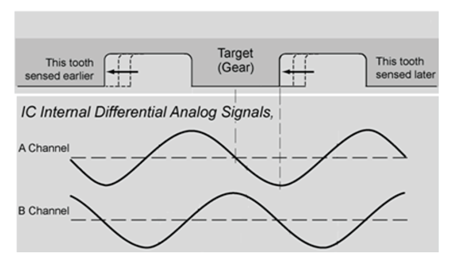
The open-drain outputs provide voltage output signals which mirror the sensed target’s shape, with a phase separation between the two channels proportional to the size of the target teeth versus the Hall element spacing. It is perfectly suited to produce two quadrature signals (Figure 4).
Maximum operational frequency of the ATS605LSG is fOPmax =40 kHz. With an n teeth target, the maximum rotation speed ω is then given by:
ω = (60 × fOPmax) / n [RPM] (1)
According to the ATS605LSG datasheet, the minimum operating differential field depends on the input field frequency fOP: the minimum field for fOP ≤ 10 kHz is 30 G and 60 G for fOP >10 kHz.
Parameters Definition when Designing the Target
Different parameters are to be taken into account while designing the mechanical target. This application note will analyze the impact of the mechanical target geometry such as target pitch and tooth/pitch ratio on the performance of the ATS605LSG when it is used as an encoder.
The parameters listed below impact the accuracy of the switching point and therefore the performance of the ATS605LSG.
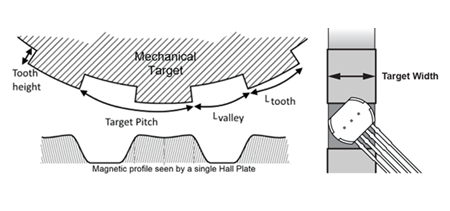
Target Pitch [mm]: defined as the length of a tooth and valley pair (Figure 5). It represents the distance of a mechanical period.
Target Width [mm]: defined as the width or thickness of the mechanical target (Figure 5).
Tooth/Pitch Ratio [unitless]: defined as the tooth length over the sum of tooth and valley length.
ratio = Ltooth / (Ltooth + Lvalley) (2)
Air Gap [mm]: defined as the distance between the branded face of the ATS605LSG sensor and the top of a tooth.
Hall Plate Spacing [mm]: defined as the distance between two Hall plates used to generate the differential signal. The spacing of both channels in the ATS605LSG is 1.75 mm.
In the following analysis, these fixed parameters are used:
Target width: 5 mm
Rectangular tooth shape: as in Figure 5
Teeth height: 3 mm
Temperature: 150°C (worst case temperature)
The target outer diameter (teeth included) is called OD, in mm.
Note that all results in this analysis come from magnetic simulations. Simulation absolute accuracy is better than 10%.
Analysis of Phase Separation and Duty Cycle
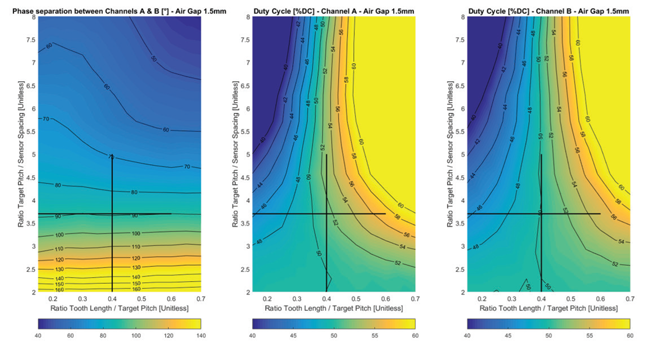
The mechanical constraints usually fix the target diameter and the air gap range. The parameters that can be adjusted to meet the encoder requirements are the target pitch (equivalent to the number of teeth) and the tooth/pitch ratio. This section analyzes the duty cycle (for both channels A and B) and their phase separation
versus target pitch and tooth/pitch ratio at 1.5 mm air gap.
The vertical axis reports the target pitch over Hall plates spacing (fixed to 1.75 mm for the ATS605LSG). The target pitch over the Hall plates spacing can be adjusted by twisting the ATS605LSG (see section Sensor Twist) if needed. The horizontal axis represents the tooth/pitch ratio.
The Figure 6 plots can be used to determine which parameter affects the duty cycle and phase separation and, consequently, select the proper target pitch and tooth/pitch ratio.
The first plot on the left shows the phase separation between channels. It appears to be stable versus the tooth/pitch ratio. The optimum target pitch/spacing appears to be around 3.7 at 1.5 mm air gap. This is equivalent to a 6.45 mm target pitch with the nominal 1.75 mm sensor spacing.
The number of teeth can then be calculated (n is a natural number):
n = (π × OD) / Pitch ≈ 0.49 × OD (3)
The number of teeth, optimized here for an air gap of 1.5 mm, could be optimized at another air gap if required by a specific application.
Temperature does not impact phase shift and duty cycle but only maximum air gap.
Once the target pitch is set, the tooth/pitch ratio can be determined based on the desired duty cycle. For an encoder system, the duty cycle should be as close as possible to 50%. The Figure 6 plots in the center and on the right indicate that this can be achieved by selecting a ratio of about 0.375. For simplicity, a ratio of 0.4 is used in the analysis.
Note that channel A and channel B graphs are different although the sensor IC is symmetric: this is due to magnetic edge effect when the target is passing in front of the sensor.
Air Gap Influence
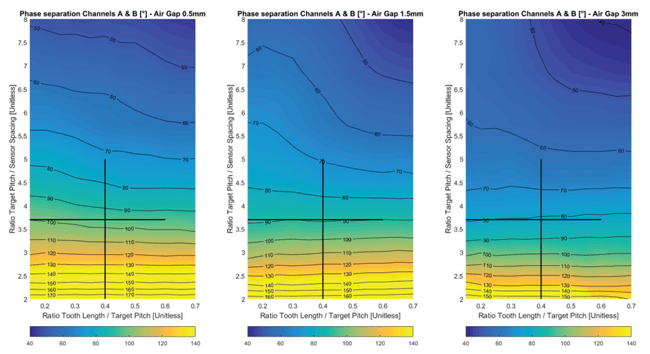
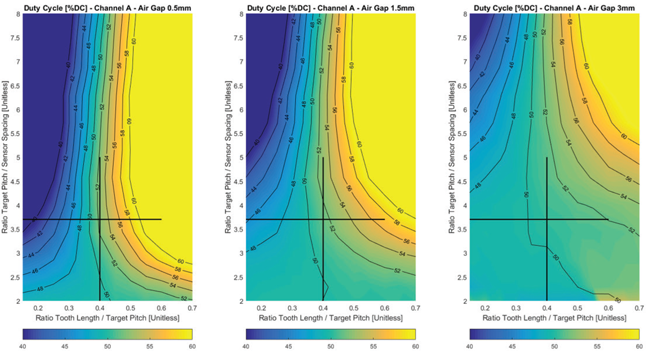
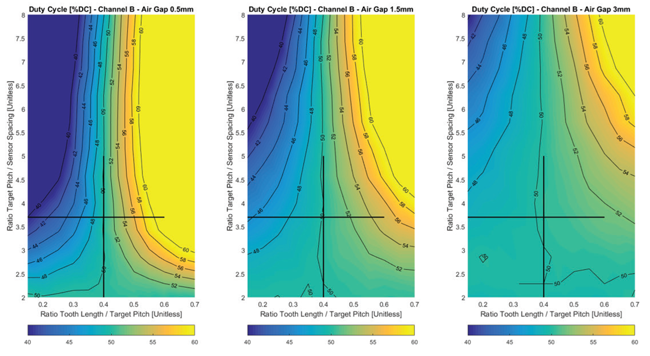
In this section, the impact of the air gap on the accuracy of the system is analyzed. The plots below represent the phase separation and duty cycle of both channels for three different air gaps: 0.5 mm, 1.5 mm, and 3.0 mm.
From these figures, it can be observed that phase separation depends on air gap.
With the parameters chosen in the previous section, it can be seen that phase variation varies from 81° at 3 mm air gap to 96° at 0.5 mm air gap. This is still within the 90 ±10° specification.
The duty cycle plots (Figure 8 and Figure 9) indicate that the region with a duty cycle around 50% becomes larger when increasing the air gap. Consequently, the tooth/pitch ratio should be identified at close air gap to ensure a full air gap capability. These graphs confirm the 0.4 ratio proposed at 1.5 mm air gap in previous section (Analysis of Phase Separation and Duty Cycle). It should also be noted that the 50% duty cycle position is stable over air gap. Consequently, if properly designed, the 50% output duty cycle should not be affected by air gap variation.
Target Width and Teeth Height Recommendations
To guarantee good performance over air gap, a target width of at least 5 mm and teeth height above 3 mm is recommended. If this is mechanically not possible in the application, contact a local application engineer to evaluate expected performance.
Max Air Gap, Phase Variation, and Optimized Number of Teeth for Various Target Diameters
The table below gives the optimized number of teeth for a given target outer diameter and the expected performances in air gap and phase separation.
Note that two air gap ranges are given: the minimum operating signal being dependent on the input field frequency fOP as stated earlier.
These results apply to a 5 mm target width, 3 mm teeth height, rectangular teeth shape, and in the –40° to 150°C temperature range.
Note that the approximate relationship n ≈ 0.49 × OD is accurate enough to guess the number of teeth whatever the outer diameter.
| Target outer diameter [mm] |
Optimized number of teeth |
Ratio tooth/pitch | Max air gap with fOP >10 kHz [mm] |
Max air gap with fOP ≤ 10 kHz [mm] |
Phase separation from 0.5 mm to 2.5 mm [°] |
Phase separation from 0.5 mm to 3.0 mm [°] |
| 60 | 30 | 0.4 | 2.4 | 2.9 | 90 ±9 | 90 ±10 |
| 70 | 35 | 0.4 | 2.4 | 2.9 | 90 ±9 | 90 ±9 |
| 80 | 40 | 0.4 | 2.4 | 2.9 | 90 ±9 | 90 ±9 |
| 90 | 44 | 0.4 | 2.4 | 2.9 | 90 ±6 | 90 ±9 |
| 100 | 49 | 0.4 | 2.4 | 2.9 | 90 ±6 | 90 ±9 |
| 110 | 54 | 0.4 | 2.4 | 2.9 | 90 ±6 | 90 ±8 |
| 120 | 59 | 0.4 | 2.4 | 2.9 | 90 ±6 | 90 ±8 |
| 130 | 64 | 0.4 | 2.4 | 2.9 | 90 ±6 | 90 ±7 |
Sensor Twist
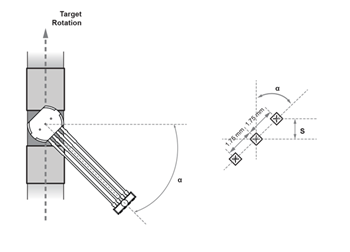
According to previous sections, the number of teeth to have both outputs in quadrature is intrinsically linked to the target outer diameter. Nevertheless, the application may require a higher number of teeth to improve encoder resolution. To achieve this without changing the target diameter, it is possible to twist the sensor as indicated in Figure 10. This simple operation enables reduction of the Hall plate spacing according to this formula:
S = 1.75 × cos α
where 1.75 mm is the Hall plate spacing of the ATS605LSG.
The projection of the Hall plates on the plane of the target rotation (Figure 10) becomes the new Hall plate spacing S. S is the spacing virtually seen by the target.
However, twisting the sensor may reduce maximum air gap. In addition, the target width must be large enough to keep the Hall plates above the target.
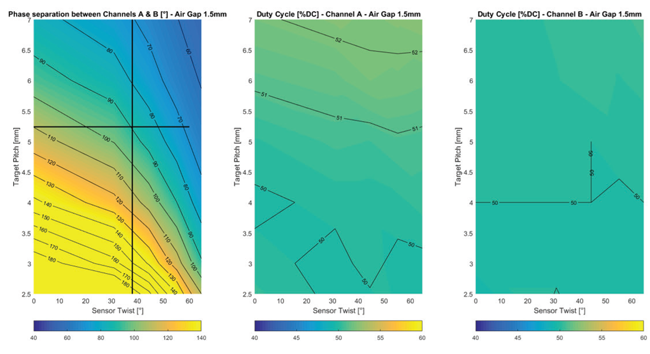
As shown in Figure 11, given for a tooth/pitch ratio of 0.4, the sensor twist affects the phase separation. The duty cycle instead is not impacted by the twist of the sensor. Note that the “noise” visible in the center plot and in the right plot of Figure 11 are not real but only come from the simulation resolution.
The table below shows, for a tooth/pitch ratio of 0.4, the maximum air gap and pitch required to have 90° phase separation versus the sensor twist.
| Target pitch [mm] | Sensor twist to have 90° phase separation [°] |
Corresponding apparent spacing S [mm] |
Max air gap with fOP > 10 kHz [mm] |
Max air gap with fOP ≤ 10 kHz[mm] |
| 6.45 | 0 | 1.75 | 2.4 | 2.9 |
| 6.15 | 10 | 1.72 | 2.3 | 2.8 |
| 5.90 | 20 | 1.64 | 2.3 | 2.8 |
| 5.65 | 30 | 1.52 | 2.1 | 2.6 |
| 5.25 | 38 | 1.38 | 2.0 | 2.5 |
| 5.10 | 40 | 1.34 | 2.0 | 2.4 |
| 4.40 | 50 | 1.12 | 1.8 | 2.2 |
| 3.55 | 60 | 0.88 | 1.4 | 1.8 |
As an example of how to use the sensor twist: assume that the application uses a 100 mm outer diameter target and requires 60 teeth for resolution purpose. The maximum rotating speed of the target is 10,000 RPM.
According to equation 3, the optimum number of teeth to have 90° phase separation would be 49.
This number of teeth is not compatible with this application. Consequently, it is necessary to twist the sensor. The target pitch with 60 teeth is, in this case:
pitch = (π × OD) / n = 5.24 [mm] (4)
According to the table (left) or to the left plot of Figure 11, the required twist is 38° to have 90° phase separation.
Since the maximum input frequency is 10 kHz (see equation 5), the maximum air gap in the application will be 2.5 mm, instead of 2.9 mm without sensor twist.
fOP = (n × ω) / 60 [Hz] (5)
Conclusion
This application note gives guidelines for developing a magnetic encoder system with the high speed ATS605LSG sensor, and shows that the best configuration to achieve 90° phase and 50% duty cycle is a target with a pitch of around 6.45 mm and a tooth/pitch ratio of 0.4. If the target pitch is not 6.45 mm and cannot
be modified, a 90° phase shift between channels can be achieved thanks to a well-chosen sensor twist.
Contact an Allegro representative for any further questions or support.
